Tuesday 17 February 2015

Mini Bunting Tutorial

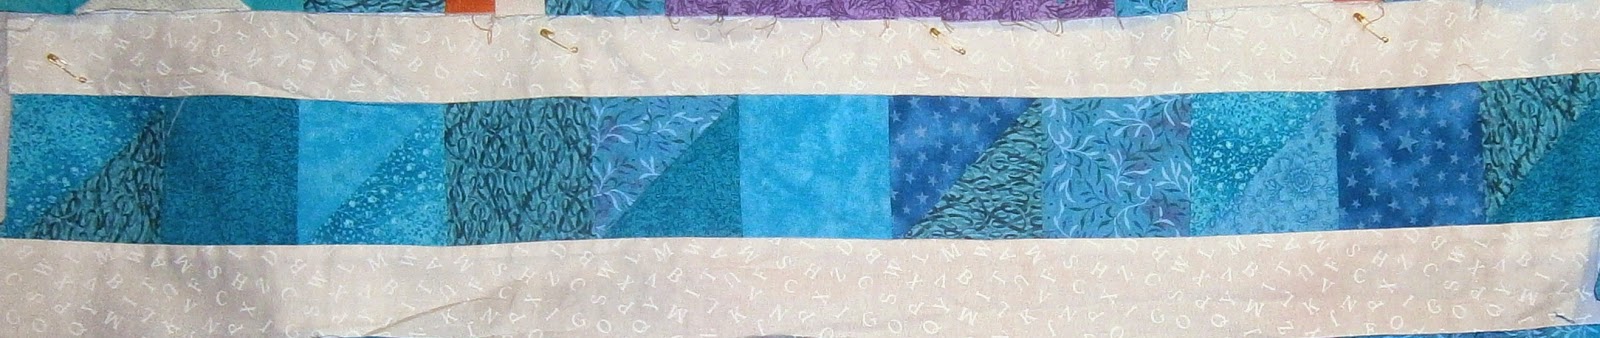
 With the excitement of getting my own Round Robin returned to me last week, I missed out telling you about the last one that I'd made for someone else.

My row is the one in the middle of this bright seaside themed quilt.  I pieced sandcastles, added a fused bucket and spade and finished it with some mini bunting (which I pinned on rather than sewing on - too hard to quilt around otherwise!
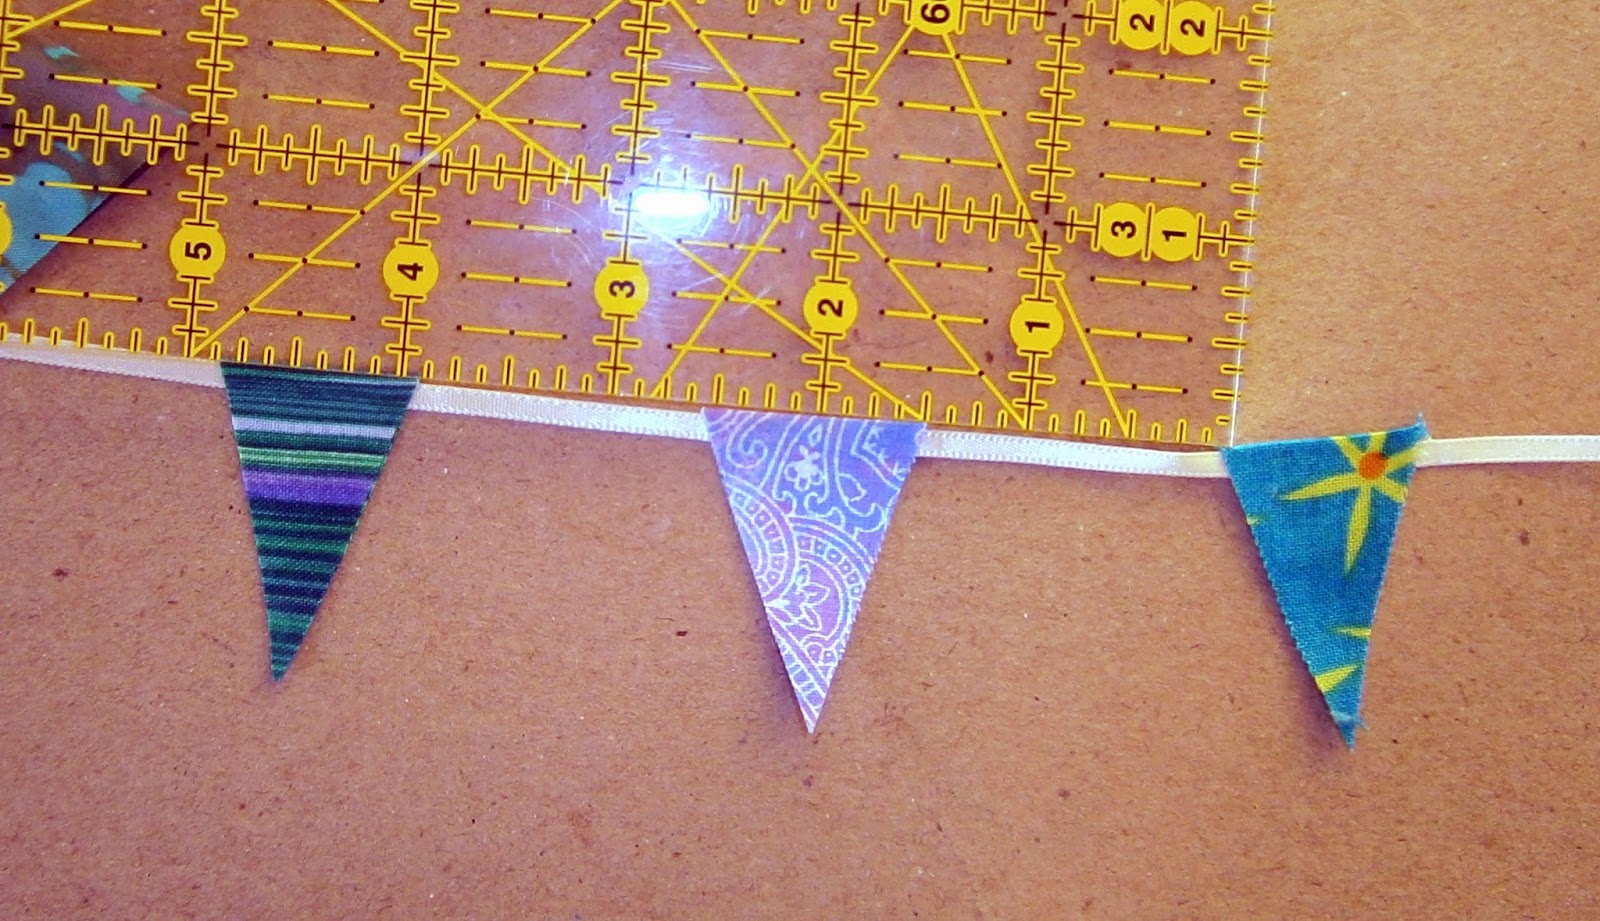
 So pleased was I with the mini bunting that I thought I'd share my quick and easy method with you.

This will give you a string of mini bunting of a yard or so - simply increase the number of flags and the length of the ribbon to suit what you'd like.

Recipe:
Narrow ribbon - 1 yard
Scraps - 12 x 1"x3"
Heat'n'bond' (or similar) - 6" square or equivalent.


1)  Cut your fusible.  You want to end up with 12 pieces of 1" x 3".

 2) Iron them onto the wrong sides of your chosen scraps.  I chose cool colours - but feel free to go as wild as you like!
 3) Cut around the fusible / fabric and peel the backing paper off the rectangles.
 4) Fold the rectangles in half, right sides out (so fusible sides together) and just touch an iron to the open ends to keep them together. 
 5) You will end up with 12 fabric 'loops' with the fusible on the inside.
 6) Time to shape them now.  I did mine by eye, but if you prefer you can measure and mark up the 1/2" point on what was the open end.  You need to cut from that centre point on the 'open' end to the edge of the closed end of the fabric loop.
7) Now do the same again on the other side of the loop.  You end up with a lovely sharp triangle and two waste triangles to throw away.

Finish the rest in the same way.
 8) Lay the flags out in a way that pleases you.
 9) Thread the ribbon through each flag 'bead'.  I spaced mine at 1 1/2" apart.  When you have the spacing that you like iron them onto the ribbon.  That's the joy of the fusible - you have just finished the bunting!

Of course, if you are really keen you could add a line of stitching (along the ribbon, or along the ribbon and around each flag).
 10) All you need to do now is to choose how to display your bunting!  Not bad for 20 minutes play!
Here's mine decorating a window.  Where is yours going to hang?


I love this little bunting!  The good news is that I have LOTS of scraps (but that's a subject for a whole other post!) - I could make enough of this to decorate the entire house!  I'm not sure that the rest of the family would stand for it though.

Have fun and let me know if you make your own!

Wednesday 11 February 2015

Round Robin Reveal!

 I was very excited to see my Round Robin after it had been away for five months.  This was my starter piece.  My theme was the Military Wives song, "Wherever My Heart", with white and turquoise as my colours.
 This strip was made by Jane, who used alphabet white on white fabric to show communication and blue squares to represent the military mail - blueies, after the blue airmail paper that used to be used.  Triangles show the questions and answers flowing around the world.

Marjolyn made this strip.  Interlocked squares for the families, Stars of Destiny, and Delectable Mountains for lifes ups and downs.
Nerida used the purple squares in this strip to show a travelling solider, always part of a family, but not always in the same place. 
 Karen has a friend who is in South London Military Wives choir - what a coincidence!  She represented her friend with a Southern Belle block, and used chevrons to denote her husband who had just been promoted.  The purple here represents their three children.
 Benta used a high shot of the choir members, where she says their heads seemed to tessellate - so I've got some of her fabulous hexies representing that.
 She was also kind enough to make me an extra (she is so lovely, always keen to go the extra mile - thanks Benta!) and has embroidered two lines from the song onto some of the turquoise fabric.

So there you have it!  I'm thrilled that people put so much thought into making the strips (and explaining their thoughts).  I feel very lucky to have had so many talented people working on my Round Robin.

*All* I've got to do now is to decide how best to put them together, and construct the quilt!

I shall let it all mature on my design wall for the moment, whilst I consider the final purpose of the quilt (sofa throw? bed quilt? wall hanging?) which will help to determine its shape, size and the quilting that it will receive.


Wednesday 4 February 2015

Oodles of Doodles!

 Over the last week or two I've been producing some Zentangle type doodles on Artists 'Tiles' - a new size card to me, cut at 3 1/2" square - so that I could share the idea with my gal pals (still trying that phrase out for size - I like the intention but it seems a bit ugly, somehow) at 'Girls Night In' - my regular kitchen table crafting outlet.

I REALLY wish that I'd made them line up the goodies that they produced - we had everything from mermaids through penguins to hearts and initials - wonderful!

So I'll just have to share some of what I've produced instead.

This is clearly an homage to Audrey II from Little Shop of Horrors - we watched the film with the girls at the weekend.
 This is an initial card.  I used different cards from Poundland - obviously I'd recommend that you actually opened up any cards that you bought that had text on the front, just in case there was text inside too.  I had a range of both 'thank you' and 'invitation' cards that had text inside them - so we needed to do an extra step and cover the writing inside with an additional piece of card or paper.
 This was what I was originally thinking of - a Valentines card (and now I feel very smug being finished early!).  I cut out the 'tangled' heart and mounted it on a black 'tile'.

I bought three Zentangle books (one of them a childrens' book - as much for me as for my DD's - I like simple, fun instructions).  They are well worth it as they give you step by step instructions and ideas on different ways to build up patterns. 
These were others that I'd been trying out different tangles on too. 

Without realising, I'd also picked the week when we have 'National Doodle Day' in the UK.  Turns out that it happens in support of Epilepsy Action - and this year is on Friday, 6th February.

The money that I received last night will be donated to this excellent cause.  Perhaps you will be inspired to doodle on Friday and send in a pound too?

Happy doodling - hope that you produce oodles too!