Tuesday 27 January 2015

More Snowball thoughts and someone else sews....

 After last week's tutorial, I thought that you might like to see another couple of ideas that I'd put together when I was thinking about the design.

This is the one that made me think of butterflies first of all - obviously you need fewer red triangles and the setting of them is less rigid.

I'd love to see this in summer fabrics, something pale yellow and floral perhaps to tie in with the butterflies, quilted to match.  Not that I have that sort of fabric in my stash, but its just how I see it in my head!
 This one, although I've shown it plain (which is how I tend to plan my quilts on the software, not necessarily sew them in real life!) it would work really well as a scrappy style quilt, using darker fabrics for the star points (the small squares of the snowballs) and a mix of neutrals for the block centres and the plain blocks.


 I haven't managed any sewing this week (but the scrapbooking is coming on well!) but my DD2 was inspired by the arrival of her Young Embroiderers Guild membership card to create a sewing kit 'roll'.
 I gave her a little helping hand with the measuring and design (and some of my duplicate embroidery flosses), but the fabric choices and the majority of the sewing was hers - even adding fabric binding to the clear plastic that became the pockets, which is something that even experienced sewists might baulk at!
Didn't she do a great job?  She has her mini sewing kit, needle book, membership card, floss and a pencil all in one handy roll.

I'm so happy that she enjoys sewing!

Wednesday 21 January 2015

Butterfly Star Quilt - Tutorial

 To make this quilt, which finishes 42" wide and 66" high (so you won't have to piece the backing unless you want to!), you will need the following:

* 2 1/4 yards of your main fabric (shown as white for my plan)
* 1/4 yd red fabric
* 3/4 yd blue fabric
* 2 yards of your backing fabric
* fabric for binding (total edges = 216" - the amount of fabric required will vary depending on your favourite way to bind!)
* Wadding - approx. 44" x 68"

Please remember that if you choose a fabric that has a right way up (like I did) that you need to pay particular attention to this when you are making the snowballs!

 First of all cut 77 x 6 1/2" squares of your main fabric.

Put 38 of them to one side - this is a quick quilt to make, so these are finished and ready to add to your layout when you've made the snowball blocks.

Next cut 3" squares from your red and blue fabrics.  You need 128 blue squares and 28 red squares to make the snowballs as I show you.  You could just save fabric and use triangles, of course.
I then set mine out with the appropriate number of main fabric squares, just to keep things straight in my head.

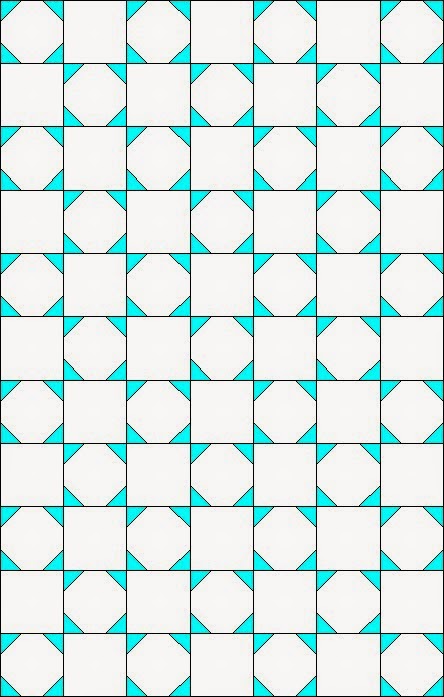
To follow the pattern above, you will need to make:
* 1 snowball with four red corners
* 6 snowballs with red at the top right / bottom left and blue at the top left and bottom right
* 6 snowballs with blue at the top right / bottom left and red at the top left and bottom right
* 26 blocks with four blue corners.
 I'm showing you my way of making snowballs - as I like to have the resulting leftover half-square triangles to play with later. 

Lay four of your coloured squares on top of one main square.  Draw a line (or stitch it straight away if you are confident!) from corner to corner, and another line 1/2" further out from the first line.

These are your stitching lines.  Go ahead and stitch them all.
Now you can cut between the stitching lines, leaving you the snowball block and four HSTs.
 Continue making all 39 snowball blocks - remember to make sure that you have the colours going to the way that you want them to!

Then press all the blocks (and the HSTs if you want to use them soon!).
 Refer to the plan and layout the pieced and plain blocks.  I set mine out half a quilt at a time as that was the space that I had near my machine.

Chain piece the blocks together, making sure that you keep the pattern.
Complete until you have the finished quilt top - well done!  That was fast, wasn't it?

Now layer up with the backing / wadding, baste, and quilt.  All you need to do now is to bind the quilt and add a label.

This is a fun and fast quilt to make - perfect for a beginner or a time-short more experienced quilter.  It would be great to see some more variations of this, so if you do make one feel free to share your finish too!

Have fun!

Wednesday 14 January 2015

A new technique for me!

I started my adult textile play with cross stitch.  I had an excellent program, enjoyed using it to create my own patterns, enjoyed the stitching.

Then I got drawn into patchwork and quilting - and cross stitch has taken a back seat ever since.

When the latest 'Round Robin landed with me, a request to add a pear to a piece of text printed fabric to replicate a crate of pears wrapped for storage, I thought that I'd try a technique I'd never tried before - cross stitch with waste canvas.

My start point was finding out (inevitably!) that the software I'd used for several years didn't work with the operating system that I have on the current PC!
 I downloaded a free trial of PMST20T, selected a photo of a pear, and created my colour pattern.

Then I mentally simplified it a bit more, grabbed the green threads from the embroidery floss drawers (oh the bliss of having a thread stash!),  pinned my aida to the printed fabric, and off I went!
 Several hours, spread over several days, and I'd got a pear that I was happy with (and no time left to stitch the leaf - oops!).

Now came the bit that required a bit of courage - removing the canvas from between the cross stitches and the print fabric!  I knew the theory but had never actually tried it before - and this seemed quite a big piece to be trying it out on!
I trimmed it first, then started pulling all the canvas threads out.  It was quite hard work - tough on the fingers whether using tweezers or not!

I did briefly wonder about leaving the canvas in but fringed, as an extra layer around the pear....it would have been less work, but not quite the effect that I wanted!

I kept going and was pleased with the finished effect!  The cross stitch is neat and regular, as you'd expect, but with a more exciting background than the single colour canvas that would usually be seen.
Not as beautiful as some of the other pears that had been created in earlier months, but a fun way for me to try out this waste canvas technique.  I'd certainly consider using it again when I want another small hand project.

How would you use it?  I can remember books suggesting that it was used for monogramming items, but I don't think that we're a monogramming sort of family (!), so I'll just be using it to add small motifs onto items, I think.

Wednesday 7 January 2015

Snowball Finish!

As I've more or less given up sewing for the first two months of the year (I know, I know, harsh, but I have to give myself time to catch up with my scrapbooking - I'm a third of a lifetime of my younger DD behind - that's over three years!) you should make the most of this quilty photo!

I'm really pleased with how the red diagonals cross - and quite proud that I managed to piece it all with the directional print (a Riley Blake that I've been unwilling to cut into!) actually heading in the right direction.

The quilting (hard to see, I know) was a freestyle approach to echo quilting starting with an 'on point' square in the red snowball block that marks where the diagonals cross over.  It created a nicely off centre focus for the quilting.

I might put a tutorial up for this quilt - despite it taking a long elapsed time for me, it is actually a quick one to make, as only half the blocks are pieced, and they are only snowball blocks, so not at all tricky!  This one is 66" x 42" - and originally I called it 'Butterfly stars' when I was planning the layout in Quilt Pro.

I like the secondary stars that appear when you make this.  Perhaps I'll cut up my scraps later in the year and make a scrappy version.  Another thing for the sewing list!

So this is my October quilt finished.  Only the November one still to make to complete my 'twelve to give away' set!